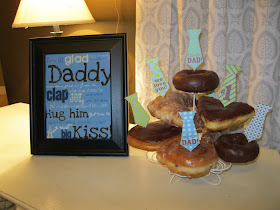
I know you all think you had the best dad and are now married to the best dad ever, but you are mistaken. My dad and husband currently hold those titles! :)
We had a great father's day at our house and it is partly this party and printable that helped add to the ambiance.
Tuesday, June 21, 2011
Saturday, June 18, 2011
land that i love
I am still very much in the patriotic frame of mind. Summer just scream patriotism to me. I have found some great ideas online that I just had to try.
These pinwheels were very springy, but I wanted to go more old-time classic red white and blue with mine.
This 2x4 flag block was genius. I love how cheap and easy it was. I was able to make 3 out of one 2x4 that only cost me about $2.
I grabbed this here. I'm always a sucker for a "keep calm" slogan! She has it in red, white, or blue.
This is just beautiful. You can get it here. I just printed and framed them with an IKEA frame.
Friday, June 17, 2011
"x" marks the spot
...or is it just a paperclip?! :)
Every month I try to think of something to make/do for the girls I Visit Teach. This is a program my church has for the women to help look out for each other, up-lift one another, and get to know one another.
Making something for them is a way in which I am able to get excited about seeing them and talking with them, and it helps me to stop and think about them during the month, not just when I visit them.
Here is the latest thing I have done for them. When I saw this idea online i just had to do it. I am always looking for ways to mark certain readings in my scriptures. Between my personal reading, family reading, sunday school, and favorites, I don't have enough ribbons to mark them. So here is my solution.
Saturday, June 11, 2011
growth chart tutorial
Making this growth chart has been on my list for a VERY long time. I finally just did it. It was so easy, I don't know why I hadn't done it earlier.
Growing up we measured our growth on a door frame. I loved that door frame. The only sad part was when my parents moved and that history was gone....
So here's my solution. I can take it with me anywhere I may go.
So here's the step by step so you can make your own.
I bought a 1x8 6 feet long board at Home Depot for just under $5. When picking your board look for one that is not knobby and isn't bowed.
Paint your board and its' sides your choice of color. Be sure to choose a color that is light enough to write on so you can track growth easily.
Run your measuring tape the length of your painted board.
Decide at what height you want your board to start (since it will be hanging on the wall). I started mine at 11" so that the 1 for the first foot would fit on. From there mark each inch with a pencil. I marked the quarters, half and foot inches longer so I would know when adding my vinyl "tics".
I used straps of black vinyl that I had to cut "tics" for the inches. You can also cut your numbers out first and then use the vinyl around them to cut the "tics". Start with the smallest size tics. Then make them longer from there for the quarter, half inch, and foot marks.
After cutting your "tics" to mark each inch, stick them to the left side of your board. I started with all my "in between inches" (don't do the quarter inch, the half inch, or the foot-those will come after and be longer).
After doing all the "odd" inches, cut your next tics to do a little longer. These will be for your quarter inches.
Next cut your "tics" a little bit longer than the last for your half inches, and then a little longer for your foot.
After attaching all your inch "tics", add your numbers off to the right. I cut out different fonts and sizes to make it whimsical. That way, nothing has to be perfect. If it's not, it adds to the look.
Find where you want to hang your board. Measure so that our board is the correct distance from the floor (this tape measure is not correct, I was just showing that you should measure). Draw a pencil line so that you can use that as your guide. Then mark where you will want your nail.
Now hang at the correct height. Doesn't it look great!
Wednesday, June 1, 2011
i can do hard things {free printable}
This is something that is very popular in my family. I find myself saying it to my kids all the time, and now I am saying to myself as I am gearing up for homeschooling.
Hope you enjoy. It is a good slogan to have. I am sure some of you can make your own to your own taste, but if you like this one just click on it to snag it. If you would prefer other colors just leave a comment.